Carling Rocker Switch (V-series) P/N’s Explained
Below we’ll explain everything you ever wanted to know about Carling V-series options and part numbers
Have you ever been stuck trying to find the correct V-series Carling rocker switches (often called contura)? You’re at the right place. We’re going to walk through the sometimes complicated, yet incredibly useful part number scheme.
We’ll explain what each digit means, and what the options are. We’ll discuss how to find a suitable substitute for a hard to fine Carling rocker switch. And We’ll walk through some example part numbers.
1 – Carling V-Series Spec Sheet
You should probably start by opening the spec sheet in another tab. Skim over it real quickly.
Lots of info, right? We’ll be focusing on the part number scheme on page 10 primarily with some reachback to page 8 and 9 (the circuit diagrams).
Over 250 million switch options available!
If you look at page 10, you can see Carling has a TON of options. Digit two allows 22 different circuit styles. There are 14 different base styles in digit four, and 32 different illumination styles in digit five!
In fact, a little math tells us there are over 250 million possible part numbers in the first 8 digits alone (272,498,688 to be exact).
1.A – Inventory and Market Availability
250+ million possibilities! How in the world does Carling stock all those part numbers?
Carling does not stock any inventory
Well, they don’t. The product is so flexible, with so many options, Carling manufactures switches to order from distributors like Rocker Switch Pros, or other system manufacturers. When any system, be it a generator, or tractor, or 4-wheeler, or boat is designed, an engineer specs a certain part number by looking at the spec sheet.
They order 500, or 1,000 or 10,000 or whatever number of rocker switches they need, and Carling builds and ships them. The flexibility is awesome, but can create havoc for you when you go to replace a single switch. Unless some distributor has ordered a case of them, the it could literally be impossible to find for sale (in volumes of 1 anyway).
Obviously you don’t want to pay for a case of custom manufactured switches to make the awning retract on your RV. That’s where we come in. Once you walk through this Carling rocker switch guide, you’ll be able to find and select the switch that meets your requirements from an endless sea of possible parts.
2 – Carling Part Numbers
This is the full Part number scheme:

However, were going to talk just about the first 8 digits today. The last 6 digits talk about the actuator, but because we sell the actuators separately (plus it complicates matters) from the switch bodies, we’ll only address the digits pertaining to the rocker switch body:

3 – Digit #1 – Series
The first digit is easy. It’s always a “V” for Carling V-series Rocker Switches.
You will have only the first 4 digits stamped on the side of your switch (the rest you have to reverse-engineer). The first of which will always be a V.
-min")
-min")
4 – Digit #2 – Circuit
Now we’re talking. Digit number 2 is the Circuit designation – very important.
The circuit digit has three important elements. It tells you a lot about your Carling rocker switch:
- What the positions of your switch are, and if they are momentary or latching
- A Single or Double Throw
- Tells you what terminals are closed (connected) in each position
Let’s dive into the second digit in your Carling rocker switches part number:
-min")
-min")

4.A – Rocker Switch Positions
There are three potential positions in your Carling rocker switches. #1, is when the switch is up. #2 is centered (if there is a center position), and #3 is when the rocker switch is down.
Shown in the center, under “1”, “2”, and “3” of course. “NONE” is listed for #2 if there is no center position.
(ON) always means a momentary function – like a horn switch would be
You can see here it’s basically a grid of ON’s, OFF’s, (ON)’s, and NONE’s. The first row is a simple ON-OFF switch (Circuit “1”, or “A”).
4.B – Single Pole and Double Pole Rocker Switches
The second important part of the circuit designation is whether the Carling rocker switch will be single pole or double pole.
“Poles” are often misunderstood. People often incorrectly call the terminals on the back of the switch a pole. Others incorrectly call the “throws” a pole. Saying “double pole” when meaning a “double throw” ON-OFF-ON switch for instance.
Poles are often misunderstood
What a pole actually means is how many different (and isolated) inputs a switch has. A double pole rocker switch will be capable of switching two voltages for example.
For the purposes of this tutorial, we’ll assume you understand the difference between a single and double pole rocker switch.


4.C – Connections – Which Terminals Are Connected
The final important part of the Carling rocker switches circuit designation is which terminals are closed (ie, connected).
As you can see, terminals 2 and 3 are always connected when the switch is up. Terminals 1 and 2 are always connected when the switch is down. This is the nature of how the electromechanical rocker inside the switch works.
terminals 2 and 5 are always the inputs
Now IF the switch is a double pole, there will also be a connection between 5 and 6 when the switch is up, and 4 and 5 when the switch is down.
Finally, this section shows some specialty circuit connections. These switches are pretty rare, but useful. Our engine start switch for example has the specialty circuit designation “M”.

We’ve included a diagram of the terminal layout of how all Carling rocker switches are organized.
All terminals are not necessarily present on any particular switch. But, the terminals will always be numbered and located as shown in this diagram.
Notice that terminals 1, 2 and 3 run down the left side. And terminals 4, 5 and 6 run down the right. These are the meat and potatoes of the switching mechanisms on Carling rocker switches. Terminals 1-2-3 are one pole, terminals 4-5-6 are only there on double pole switches.
Terminals 7, 8, 9 and 10 (if present) are for switch lighting only. Everytime and always. Terminals 7 and 9 are always negative (return current for lamps). Terminals 8 and 10 are always independent lamp positives.
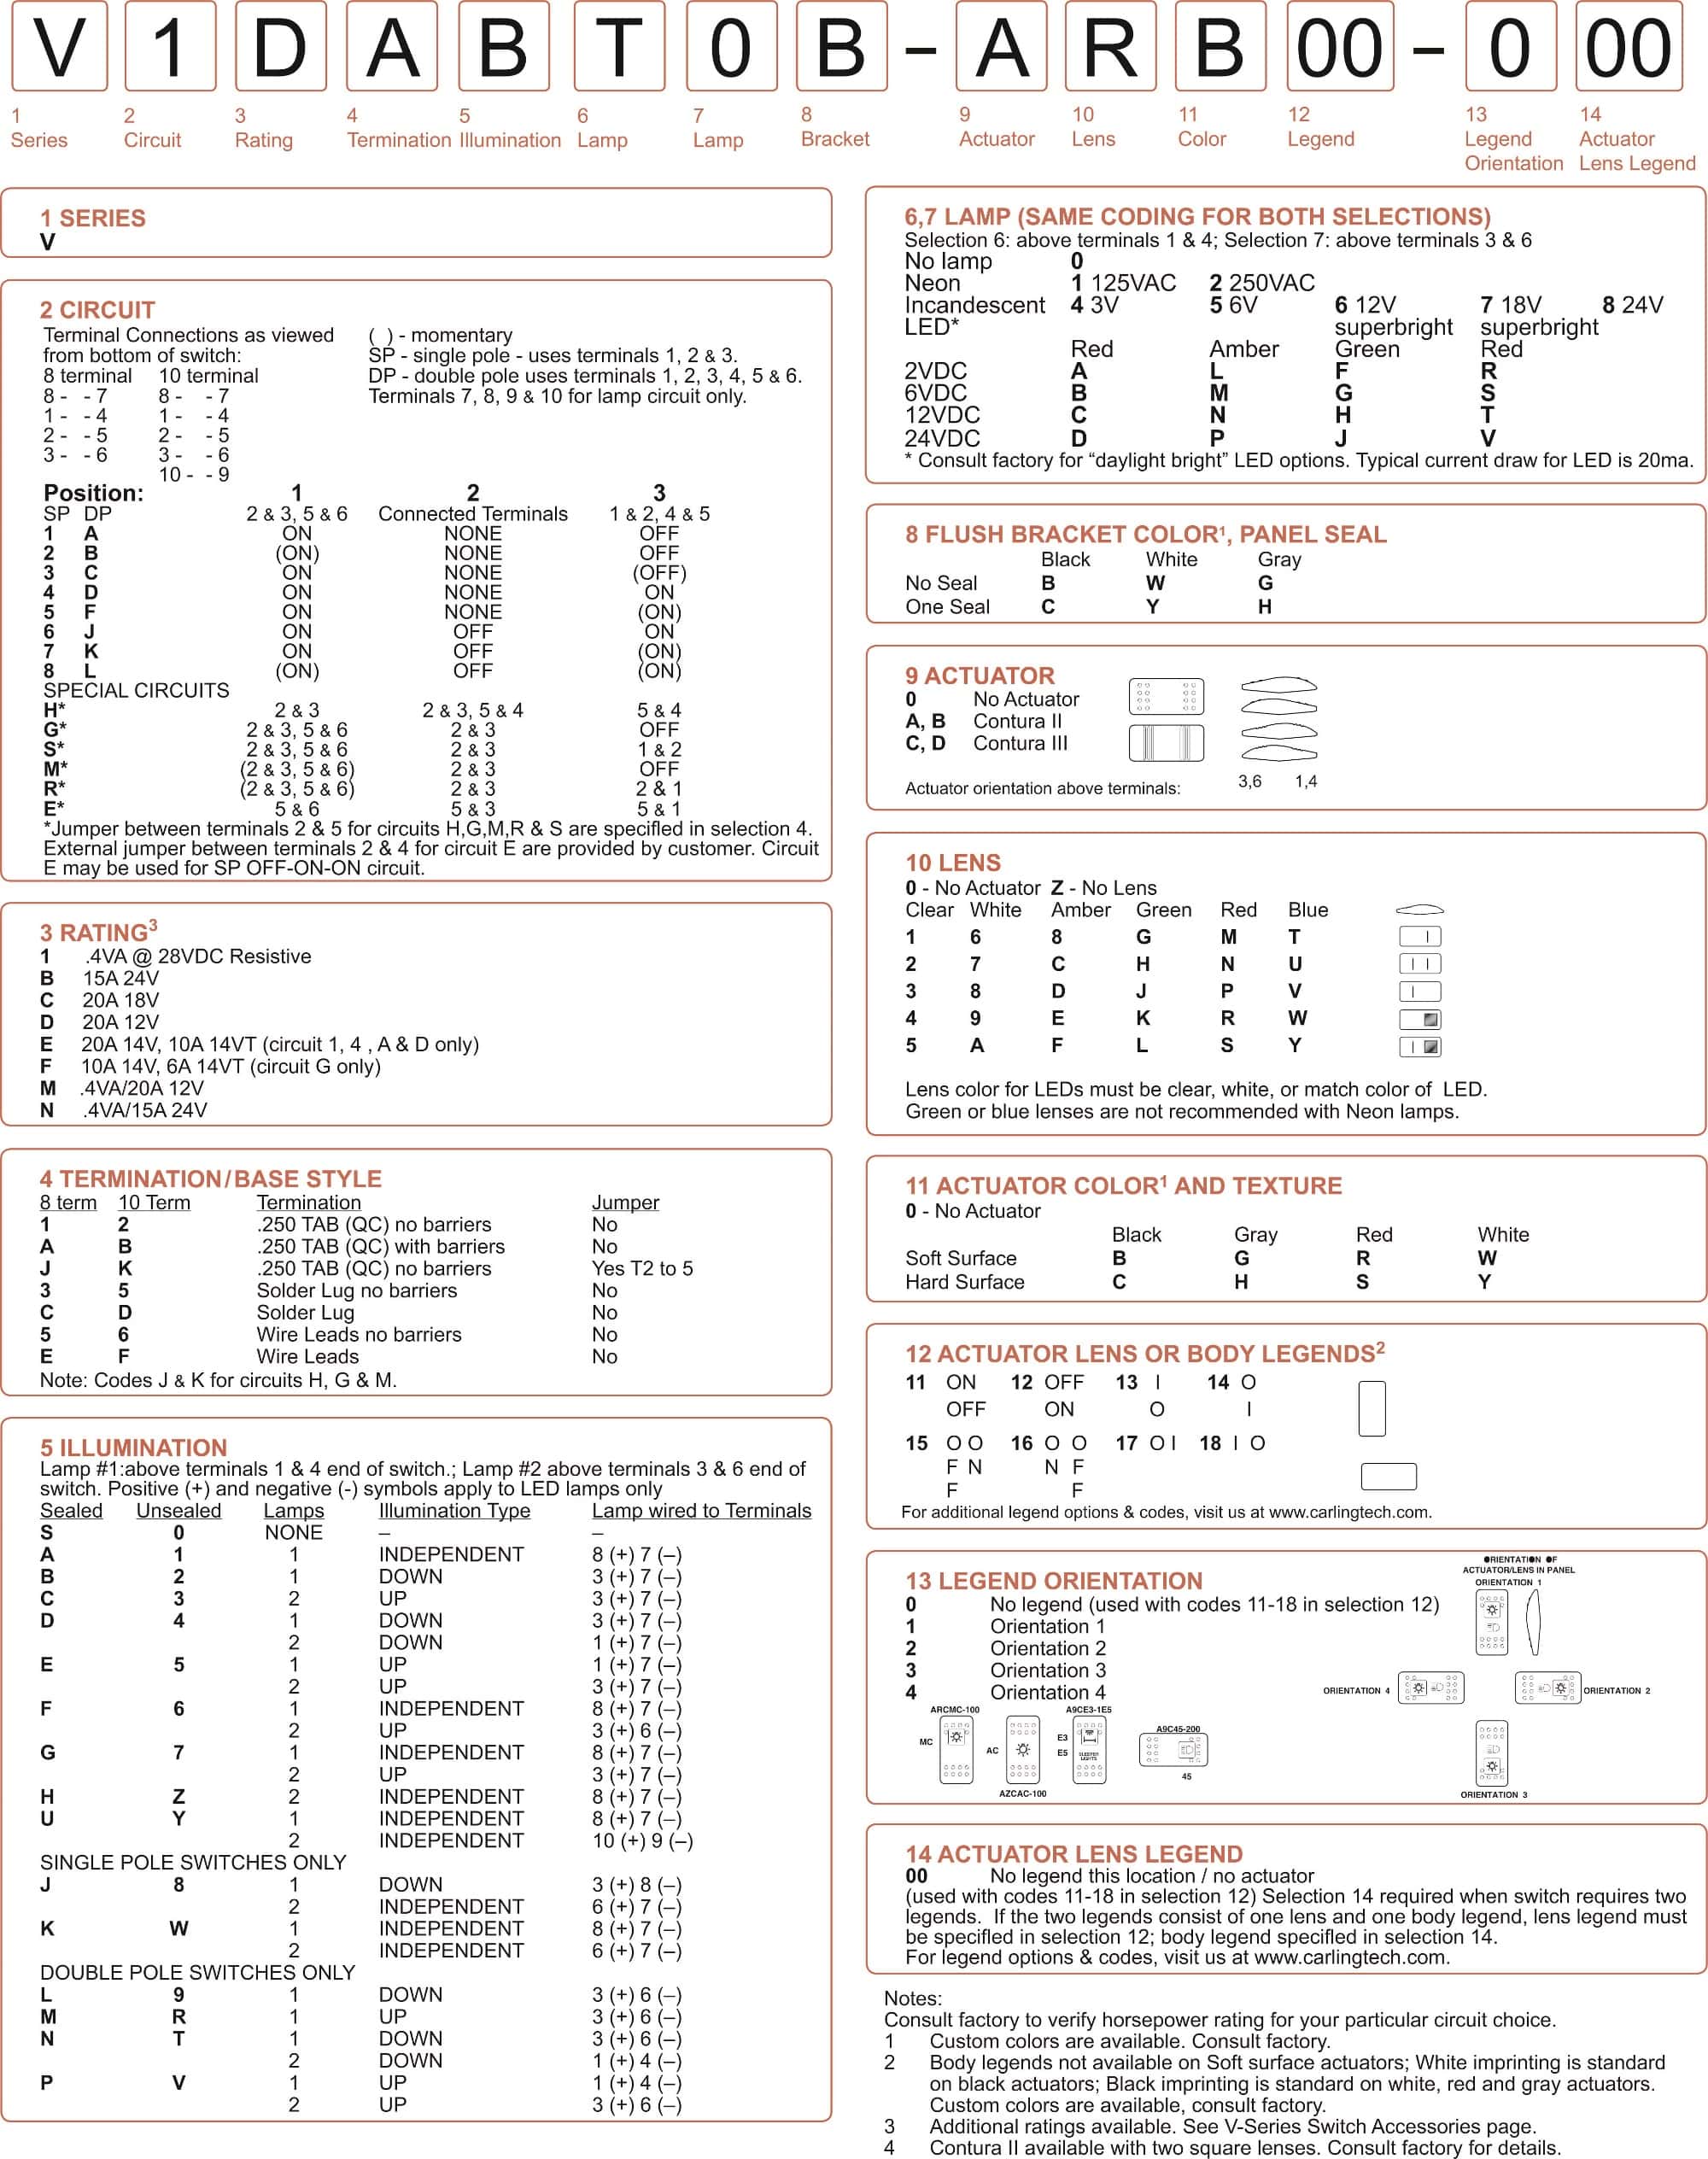
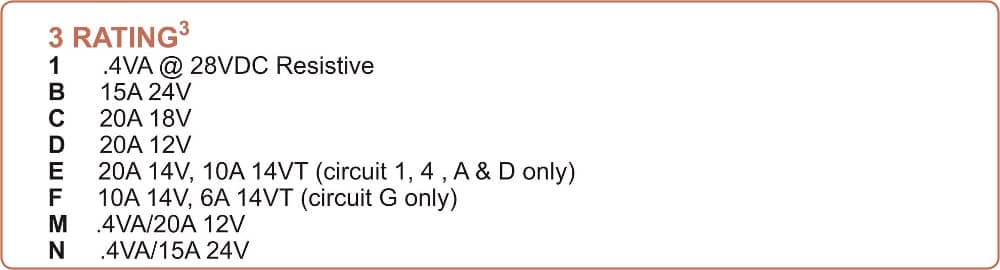
5 – Digit #3 – Rating
The rating of your Carling rocker switch is also fairly straightforward.
“D” is the most common when dealing with automotive Contura switches because they run on 12Vdc.
“B” is what you’d look for for 24V systems (note, “D” rated rocker switches with no light in them can also be used on 24V systems because the contacts are the same as “B” rated switches).
“1” rating in digit 3 means they have a special gold plated contact with minimal resistance. In most automotive applications operating at 12Vdc or 24Vdc the corresponding “D” or “B” rating can be substituted.
C, E, D, M and N ratings rare and you probably won’t run across them.
6 – Digit #4 – Rocker Switch Termination and Base Style
The termination style is important if you need to use a specific connector on your rocker switch. It can also get you in trouble because it can cause conflicts with other digits making an “impossible to produce” part.
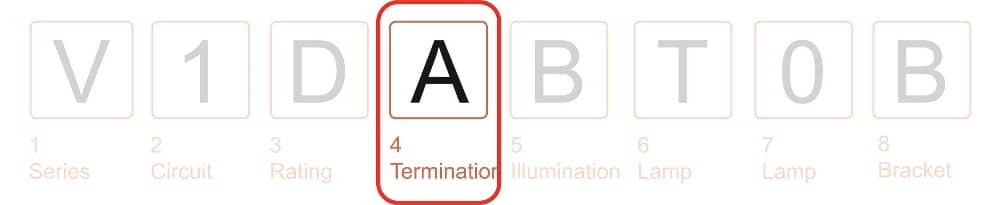

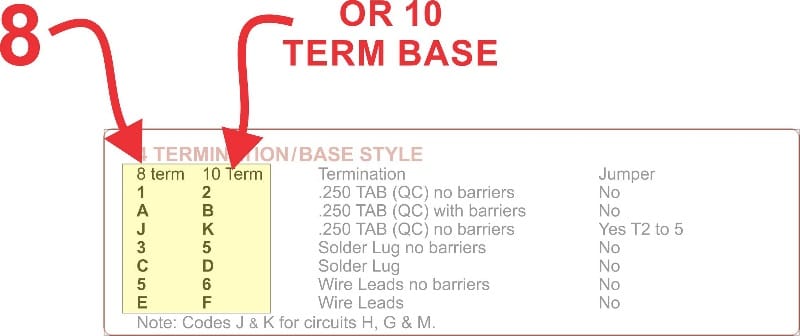
6.A – Rocker Switch Base Terminal Quantity
Contura switches can be made with one of two base molds. An 8 terminal base, or a 10 terminal base, which are defined by the columns in digit 4
8 terminal bases are more common. But you will need a 10 terminal rocker base part number if you need an independent light on the bottom of the switch, like our VJD2U66B rocker switch.
Now this is not to say that every terminal will be present. An 8 terminal base could have as few as 2 terminals like this simple ON-OFF rocker switch. You can think of the base style as the mold that allows the max possible terminals of 8 or 10.
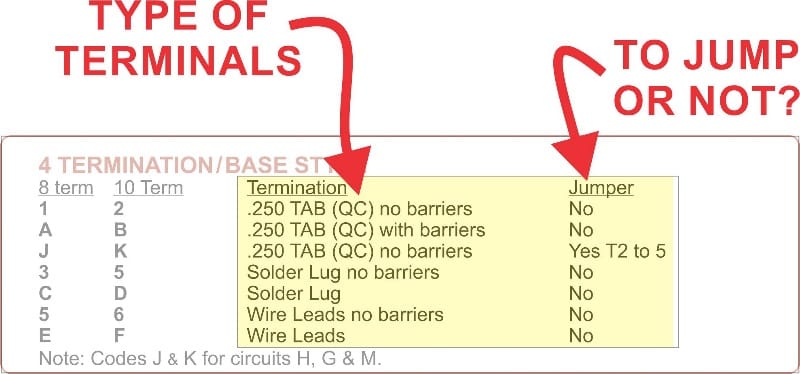
6.B – Termination Style & Jumpers
The rows in digit 4 describe the type of terminals it will have. The first row is most common (1 or 2 in this digit). 0.250″ Quick Connect terminals are easy to work with and very common.
The barriers referred to in rows 1, 2 and 3 describe the plastic ridges on the back of the rocker switch that separate the terminals. We find that as long as you are using insulated terminals like we carry, it is much easier to work with and wire a rocker switch without barriers.
The last 4 rows of this digit describe the less common screw and wire lead termination type.
Jumper Column:
The jumper column is “No” for everything except Termination codes “J” and “K”. When this termination style is selected Carling will build the rocker switch with a brass pre-installed jumper between Terminals 2 and 5, connecting the two poles of the switch. Our VMDJ rocker switch is a good example of this.

7 – Digit #5 – Illumination Syle
Everybody likes pretty lights. The number of illumination styles are one of the awesome things about Contura rocker switches. Independent lights for instance make the illuminated rocker switches described here possible.
Of all the charts on the Carling spec sheet, this is probably the most difficult to understand. So we’ll break it down piece by piece.
Don’t read any further though until you understand the difference between a dependent and independent lamp.
Also note when reading this chart that lamp 1 is at the top of the switch, and lamp 2 is at the bottom.
Will not be shown on the side of the switch
As we mentioned starting out, this is the 5th digit – the first important digit to NOT be stamped on the side of your switch (only the first 4 are shown). So it may take quite a bit of troubleshooting to determine what character should be here if you’re trying to replace an existing rocker switch.

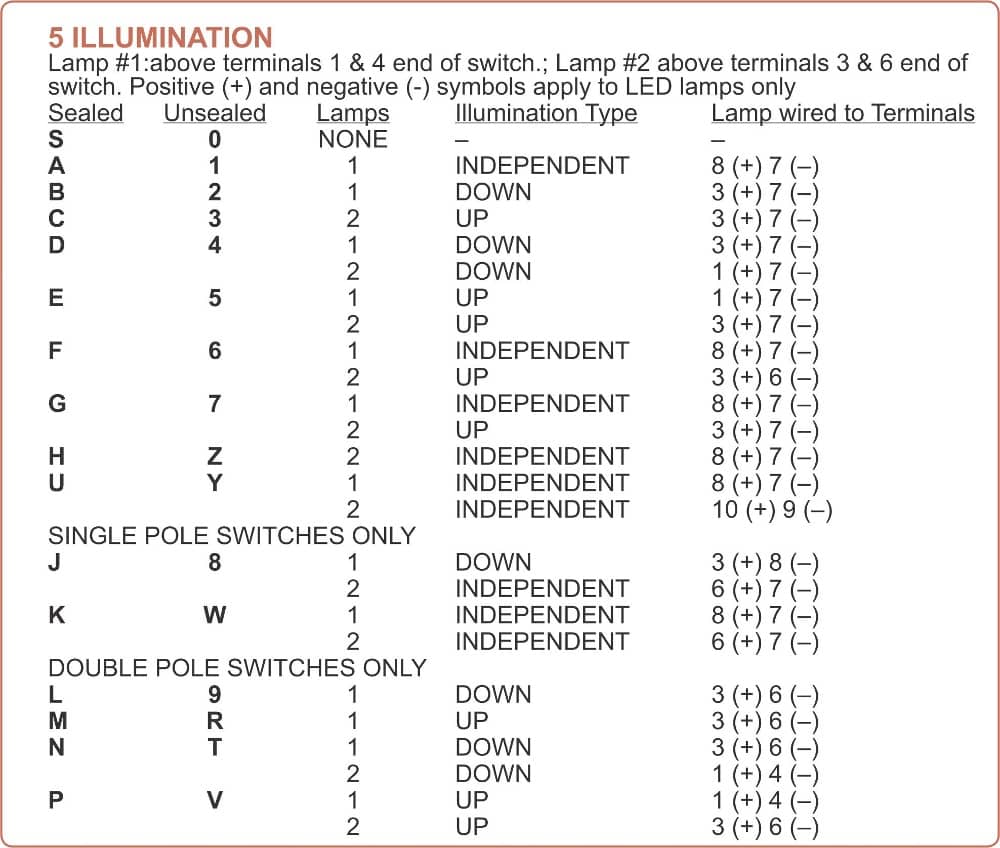

7.A – Sealed or unsealed rocker switch?
The first two columns of digit number 5 give the option of choosing a sealed rocker switch or not. This defines whether it gets an O-ring around the lamp, and it tells whether it complies with Carling’s awesome IP68 submersion waterproofing.
Since most people look to the Carling V-series line for marine and off-road use, we only stock the sealed rocker switch variants. So the 5th digit will always come from the left column.
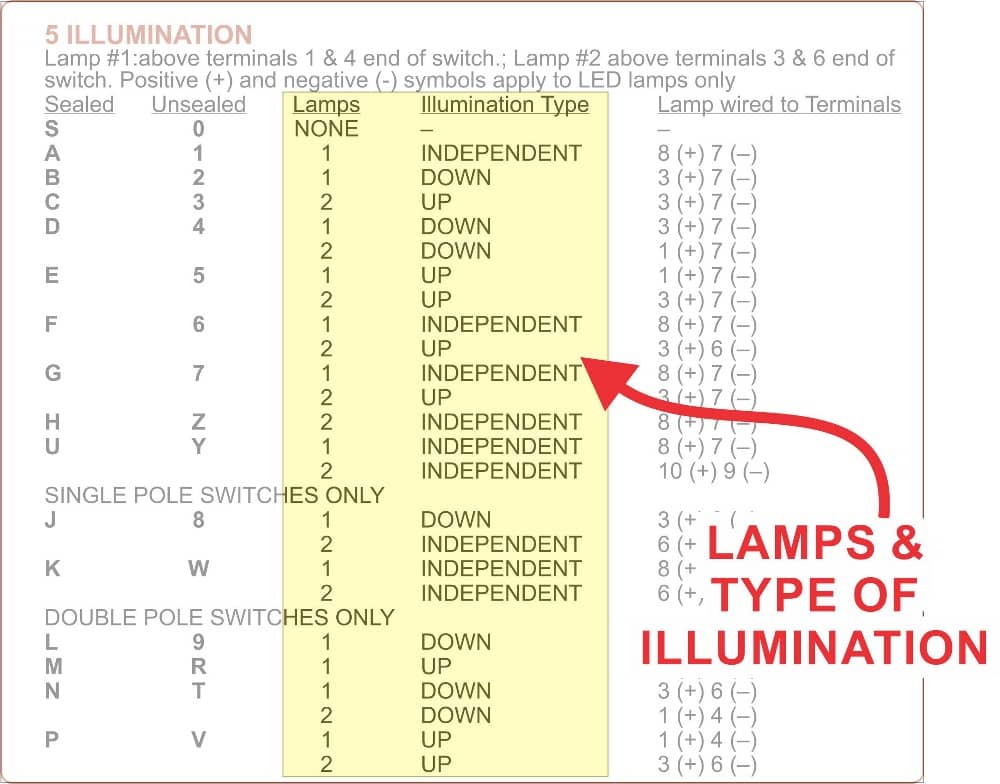
7.B – Lamps and Types of Illumination on Carling Rocker Switches
This is perhaps the most difficult to understand section of this entire spec sheet… so bare with me.
The “lamp” column describes which lamp we’re talking about in the “Illumination Type” column:
- for the top lamp (near terminal 1)
- for the bottom lamp (near terminal 3
The “Illumination Type” column describes when that light will come on. There are (3) options:
- UP – light comes on when the switch actuator over the lamp indicated is up
- DOWN – light comes on when the actuator is down over the lamp indicated
- INDEPENDENT – the light is attached to a terminal and triggered independent of the switch position (more on this here)
So “UP” and “DOWN” in this column indicate dependent lamps that are internally wired to the current position of the switch.
Don’t worry, we’ll show some examples at the bottom of this section.

7.C – Terminals wired to the lights
The final column for Carling V-series digit 5 describes which terminals in the switch that light is wired to.
You may notice that independent light functions are always wired to Non-contact connected terminals. These terminals do not switch the load current, but are provided only to trigger the light from an external source. The top two and bottom two (if they exist) terminals are the non-contact terminals. So that’s 8, 7, 10 and 9.
Polarity is also shown in this section, but that applied only to LEDs. Incandescent lights are polarity insensitive so they will illuminate in either position… although it’s almost always best to follow the convention shown.
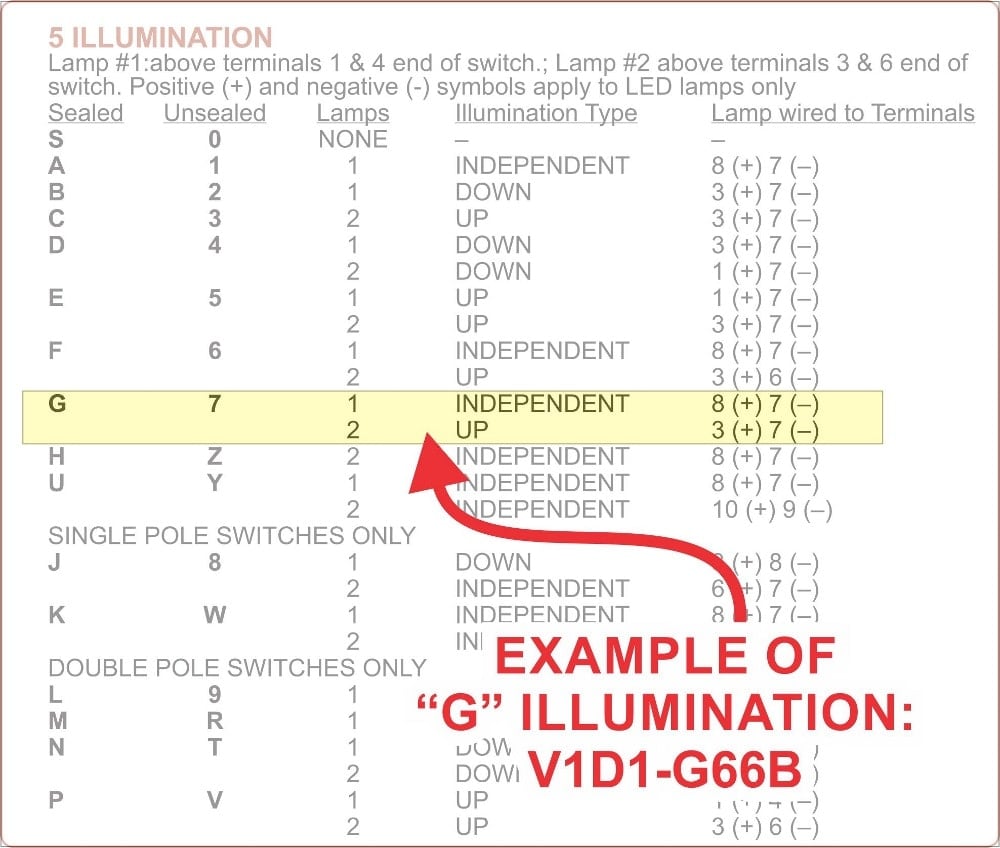
7.D – Example 1: “G” Illumination of V1d1-G66B
Let’s use our very popular V1D1G66B as an example.
It has a “G” code in the 5th digit, so we know the following:
- It is sealed because “G” is under the sealed column
- It has two lamps because it has two lines
- The top lamp (#1) is independent, meaning it is triggered externally.
- The top independent lamp takes it’s positive from terminal 8
- The bottom lamp (#2) is dependent
- The bottom lamp is tied to the output terminal (T3) internally (by definition: dependent)
- The bottom lamp comes on when the switch is in the UP position
- The top and bottom lamp share a common negative (T7)
So this little guy is perfect for out etched rocker switch actuators with a layout where the symbol and text is at the top, and an indicator shape is etched at the bottom for the dependent light.
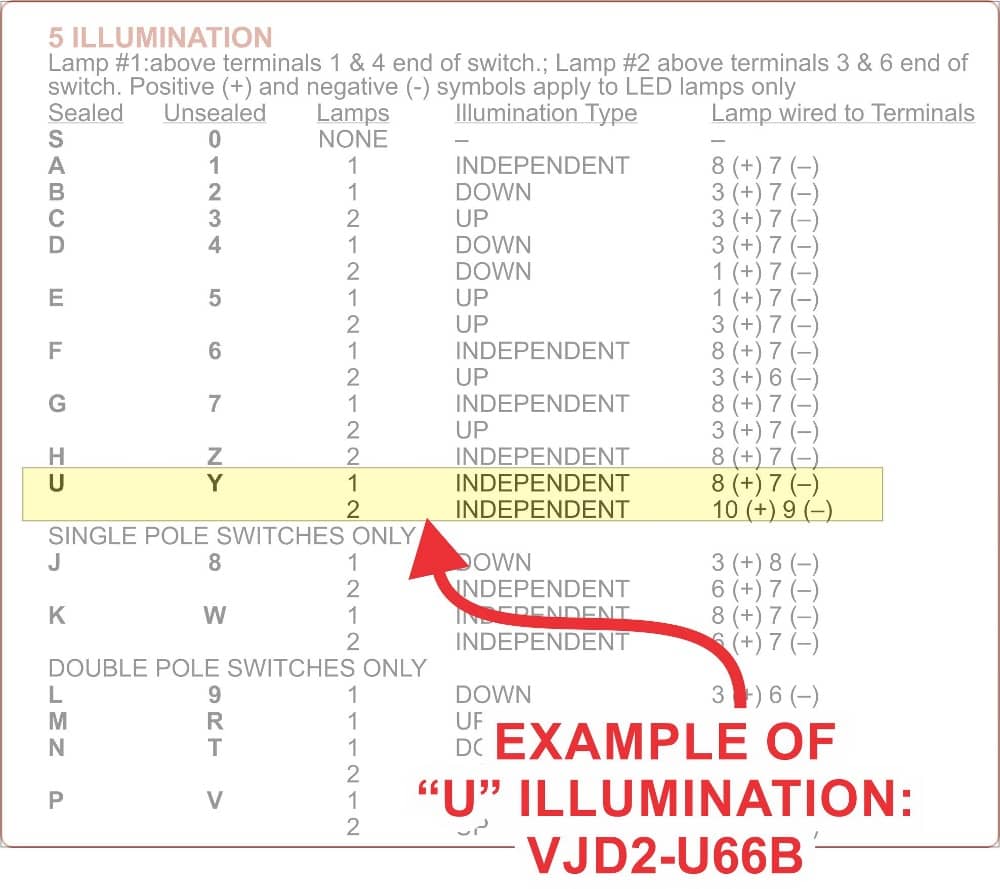
7.E – Example 2: “U” Illumination of VJD2-U66B
Let’s do one more using our VJD2U66B Carling rocker switches as an example.
It has a “U” code in the 5th digit, so we know the following:
- It is sealed because “U” is under the sealed column
- It has two lamps because it has two lines
- Both lamps (#1 and #2) are independent
- The top independent lamp takes it’s positive from terminal 8
- The bottom ind lamp takes it’s positive from terminal 10
- The top and bottom lamp do not share a negative, so you’ll need to provide a negative to T7 and T9 separately.
This contura switch is often used when you’re running two loads from the same switch. You might design a custom switch cover for this switch with a layout where there is a “forward light” at the top, and a rear light” at the bottom for example. You could send your head light circuit to both terminals 8 and 10 to make both the top and bottom light up for readability when the head lights are on.
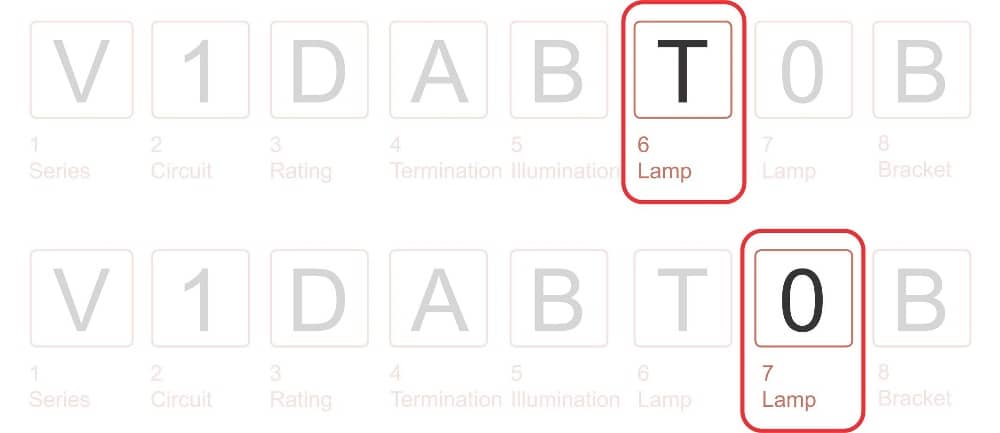
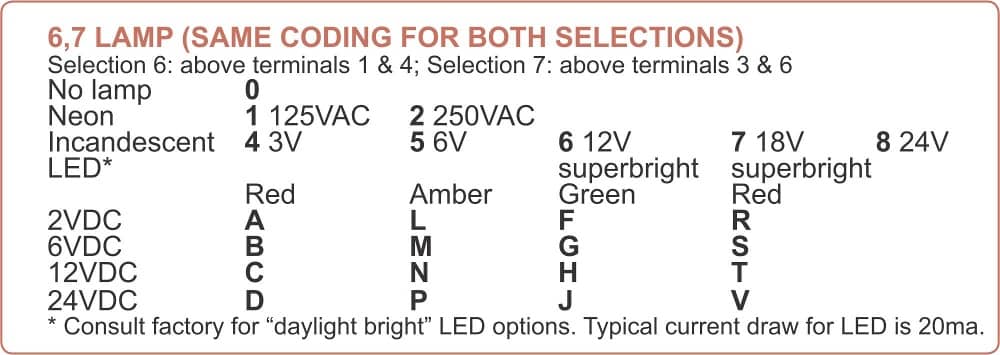
8 – Digit #6 and 7 – Lighting Colors
So you made it through our illumination type available on Carling rocker switches. It’s downhill from here.
Digits 6 and 7 of our part number are for the colors of the lights, and pretty straightforward.
They use the same code for both, digit 6 is for the top light and digit 7 is for the bottom. If there is no light in that spot, then the code 0 (zero) will be used.
Since incandecent lights are voltage sensitive, and LEDs must be ballasted differently, this is also where you’ll find the voltage spec for the lights in the switch.
Note those LEDs labeled “superbright” are in fact very bright! In this section we stock the largest selection of code “6” incandescent lights because they are by far the most popular. Incandescent lamp carling rocker switches have a MTBF (Mean Time Before Failure) of 10,000 hours though, so don’t be worried about their longevity based on their lamp style.
9 – Digit #8 – Base color
The final digit is simply the color of the plastic used to make the rocker switch body. It’s also used to specify whether it comes from Carling with an included gasket or seal.
This is digit almost always “B” for black with no seal, as black is by far the most common, and the gaskets are easy to purchase separately.